Understanding the Tiki Head 3D Layered SVG Cut File for Custom Shadowbox Art
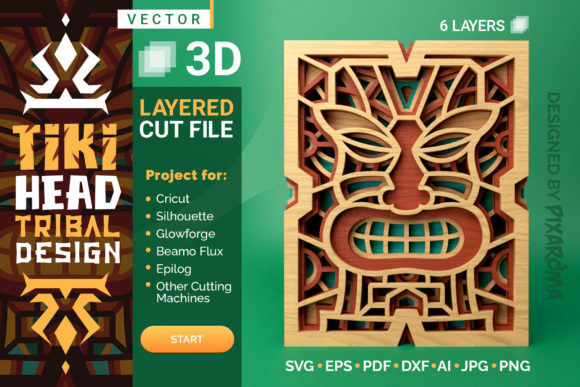
The Tiki Head 3D Layered SVG Cut File represents a specific approach to digital crafting that bridges the gap between traditional paper art and modern dimensional design. Often referred to in crafting circles as a Tribal Exotic Tiki Head 3D Layered SVG Cut File, this resource is designed for users who want to create depth without the complexity of full-scale sculpting or woodworking. It allows crafters to produce a striking visual piece that mimics the appearance of a carved wooden totem or a layered paper sculpture using standard cutting machines.
At its core, this file type is not merely a flat image; it is a structural blueprint. The design consists of six distinct layers that, when assembled correctly, transform a two-dimensional cutout into a three-dimensional object. This distinction is crucial for anyone evaluating whether this product fits their current project needs. Unlike single-layer SVGs that result in flat silhouettes, this layered approach requires a different set of skills and materials, offering a more dynamic final product that catches light and shadow in ways flat designs cannot.
Distinguishing Features and Design Mechanics
The primary characteristic that sets this Tiki Head 3D Layered SVG Cut File apart from other digital assets is its multi-layer architecture. The design typically includes six separate files, each representing a specific plane of the tiki head, ranging from the background elements to the most prominent facial features like the nose, eyes, and teeth. This segmentation allows for the creation of a "shadowbox" effect, where the subject appears to float above the base layer.
The versatility of the file format is another significant factor. While many layered designs are restricted to paper or cardstock due to their intricate details, this particular SVG is engineered to work with a variety of substrates. Users frequently utilize heavy cardstock for a vibrant, colorful look, but the same digital file can be applied to plywood, MDF, or acrylic sheets. This adaptability makes it suitable for both indoor decorative pieces and outdoor projects, provided the material chosen is weather-resistant.
To achieve the intended 3D aesthetic, the assembly process relies on spacers rather than direct adhesion. The instructions emphasize the use of double-sided foam dots, adhesive tabs, or tape between each layer. This technique creates physical separation, allowing light to pass through the gaps and cast shadows that define the contours of the face. Without these spacers, the layers would fuse into a single flat plane, defeating the purpose of the layered design. For wood projects, where foam dots may not provide enough rigidity, crafters often substitute acrylic shims or thin strips of wood to maintain the necessary height.
Evaluating Alternatives and Comparable Options
When considering a Tiki Head 3D Layered SVG Cut File, it is helpful to compare it against other methods of creating similar artwork. One common alternative is purchasing pre-made wooden tiki masks or resin statues. While these offer immediate gratification and durability, they lack the customization potential of a DIY project. A purchased item comes in a fixed size, color scheme, and finish. In contrast, the digital file allows the creator to choose the exact dimensions, select from an infinite palette of colors or wood stains, and control the level of detail by adjusting the thickness of the layers.
Another comparison point is single-layer SVG files. These are widely available and significantly easier to cut and assemble. However, the tradeoff is a lack of depth. A single-layer tiki head looks like a sticker or a simple silhouette. If the goal is to create a focal point for a room, such as a centerpiece for a Polynesian-themed party or a permanent wall installation, the single-layer option often falls short. The layered file provides a professional, gallery-quality finish that single-layer cuts struggle to replicate without additional framing techniques.
There is also the option of 3D modeling software to create custom tiki heads from scratch. While this offers total creative freedom, it requires advanced technical skills and expensive software licenses. The Tiki Head 3D Layered SVG Cut File serves as a middle ground: it provides a professionally designed structure that is ready to use immediately, saving hours of design time while still allowing for material and color experimentation. It is particularly advantageous for hobbyists who own a Cricut or Silhouette machine but do not wish to learn complex 3D modeling.
Material Considerations and Assembly Tradeoffs
Selecting the right material is a critical decision factor when working with this digital asset. Cardstock is the most accessible option, requiring minimal setup and producing a lightweight result ideal for classroom projects or temporary decorations. However, cardstock lacks the durability needed for high-traffic areas or outdoor use. For those seeking longevity, plywood is a superior choice. Cutting plywood requires a more powerful blade and slower speed settings, but the resulting piece is robust and can be stained or painted to match any interior decor.
A significant limitation to consider is the time investment required for assembly. The six-layer design means that the user must cut, weed, and stack six separate components for each finished head. This process is more time-consuming than cutting a single shape. Furthermore, the alignment process demands patience. If the layers are not stacked in the precise order indicated by the guide, the final image may appear distorted or misaligned. The requirement for spacers adds another step; users must measure and apply foam dots or tabs to every single layer, which can be tedious for large batches of items.
Additionally, the reliance on adhesives presents a potential risk. Using glue directly between layers, as opposed to foam spacers, will flatten the design. This is a common mistake among beginners. The difference between a successful 3D shadowbox and a failed flat cutout lies entirely in the spacing mechanism. Therefore, buyers must ensure they have the necessary supplies—foam dots, tabs, or acrylic spacers—before beginning the project. Failing to account for these materials can lead to frustration and wasted resources.
Decision Factors: When to Choose This File
This Tiki Head 3D Layered SVG Cut File is the optimal choice for individuals who value dimension and texture in their crafts. It is particularly well-suited for event planners looking to create unique centerpieces, teachers designing interactive art lessons, or DIY enthusiasts wanting to personalize home decor. If your project involves a need for depth, such as a framed shadowbox display, this file provides the structural integrity required to make the artwork pop off the page.
Conversely, if you are looking for a quick, low-effort project, or if you are working with a limited budget that does not allow for multiple types of materials and adhesives, a simpler single-layer design might be more appropriate. Similarly, if you do not own a cutting machine, you would need to outsource the cutting, which could negate the cost savings of buying a digital file. In such cases, purchasing a pre-made item might be more economical.
The file also shines in scenarios where customization is key. For instance, if you need a tiki head that matches a specific brand color or fits a specific frame size, the digital nature of the file allows you to scale the design to exactly 90% or 110% of the original size before cutting. This flexibility is impossible with mass-produced goods. The ability to experiment with mixed media—such as combining wood layers for the base with metallic cardstock for the accents—is another unique advantage of this format.
Maximizing the Result with Proper Techniques
To get the most out of the Tribal Exotic Tiki Head 3D Layered SVG Cut File, adherence to the assembly guide is non-negotiable. The layers must be stacked in the correct sequence, usually starting from the largest background piece and working inward to the smallest facial details. Using a ruler or alignment tool during the stacking process can help ensure that the features remain centered and symmetrical.
For wood projects, the thickness of the material plays a vital role in the final look. Thinner woods (like 1/8 inch) may require additional support to prevent warping or sagging over time. In these instances, incorporating acrylic spacers or thicker foam cores can add the necessary stability while maintaining the 3D profile. Conversely, thicker woods (1/4 inch or greater) may naturally provide enough separation that minimal spacers are needed, though some users still prefer to add a thin layer of foam to ensure a clean, crisp edge between layers.
Ultimately, the success of this project depends on the balance between the digital precision of the file and the manual dexterity of the assembler. By understanding the strengths of the six-layer design and respecting the limitations of the materials used, crafters can produce a stunning piece of art that stands out from standard flat decorations. Whether used as a standalone sculpture or framed within a complementary shadow box, the finished product offers a tangible, dimensional quality that elevates the aesthetic of any space.